Sunday, September 25, 2011

Final Skin Pieces and Midwest Gathering

The 2011 Midwest R2 Builders Gathering was a lot of fun last weekend. We had six droids, of which only 3 were mobile, including mine. Funny thing happened though. When I assembled R6, I found I had forgotten the two bolts that hold the leg pipes to one another. Without them, the right leg had too much movement in it to drive R6 around without the right foot catching on the ground. And so once again R6 had to stay stationary. When I got home I found the two bolts and did a test drive in my living room. I'm happy to say R6 handled well being on carpet. Only thing I still to work on is the body tends to drift to one side on the leg pipes and sometimes the legs will rotate if too much pressure is applied (such as pushing R6 manually). Will need to find a way to better lock down the leg pipes.

One of the attending builders made a 2-second time lapse video of the gathering. It's only a couple of minutes long, but I think it sums up the event well.


Another builder took a lot of photos of the gathering.


So now that that is over and done with, back to building.

I've started working again on the aluminum skin panels. I have primed the remaining panels already J.B. Welded and have J.B. Welded the last two panels.
Photobucket Photobucket

I'll prime those last two panels and then paint all the them together. When that's done, I'm going to get the others out and apply clear coat to them as I've done with the feet. After that, all that's left is to paint the main pieces and install. Maybe I can have that done before New Years?

John

Thursday, September 15, 2011

More painting and Head Assembly.....continued....

So far so good. The head is turning out wonderfully. Glued on the top ring tonight and finished painting the feet.

One thing I forgot to do was figure out the center foot's ankle lock. One idea suggested to me at Droid-Con was drilling a bolt through the bottom of the foot into the bottom of the ankle. I think that will work. I'll save doing that for Saturday morning. Love last minute modifications.

John.

Wednesday, September 14, 2011

More painting and Head Assembly

Sanded and applied final coat of paint and clear seal today to the feet. Should be dry by Friday night.

Glued the styrene circle to the head base plate last night. This morning solid as a rock. So now I am gluing the four upright ribs and the middle disc to the base plate.


Should be dry by this time tomorrow. Then I just need to glue on the top disc and then maybe the other piece of styrene to the neck. This new head is going to be awesome!

John

Tuesday, September 13, 2011

New Head, Ankle and Painting Feet

Today I was able to spend a little bit of time in the shop to finish the head and center ankle.

The new center ankle has all it's mounting holes drilled. One thing I forgot to do, which I will have to wait to do on Saturday at the last minute, is cut out a section of the ankle on the top. You can see where I need to do this in this side-by-side comparison of the old and new center ankle. Always something.

The head I'm happy to say is about done. All the pieces fit together like I wanted. All that's left is to glue it together and then cut a hole in the bottom.


That last picture is the two styrene pieces I cutout. The full circle piece will go on the base plate and the partial circle piece will wrap around the neck. I will need to by more styrene to finish it.

Before I glue the head together I'm going to glue the full circle styrene piece to the base plate first, otherwise I'd have to cut it to wrap it around. I'm testing an adhesive at the moment to bond the styrene to wood. If all goes well, I'll glue it tomorrow.

As for the feet, I just need to apply one more coat of paint plus clear coat and then I need to paint a few spot on the bottom of them. I hope to have this all done by Saturday morning (no pressure).

John

Sunday, September 11, 2011

Back Log of Updates

Sorry I haven't posted in a while. I have been working on R6, but work has kept me busy and so I've been putting off posting updates. So get ready to be bombarded with progress.


First bit of news is the upcoming Mid-West Droid Builders gathering in northern Indiana this weekend. To prepare I've been repainting the feet, rebuilding the center ankle and repairing the wiring from everything that happened at Droid-Con last May. Wiring is done and the new center ankle will be ready as soon as the glue drys and I drill the mounting holes. The Feet are primed and just need to be painted and clear-coated.
Photobucket

And now some progress on the Logic Displays. Wait....what? The Logic Displays?! Really? An actual update on the Logic Displays?! Yes, it's true. It's been awhile hasn't it. But don't get too excited. It's not much. All I did was drill a hole.
Photobucket
This hole is where the fiber optic strands will fit into the LED tube. All that's left now if to make a block to fit each cord of fiber into so they're arranged correctly. Just need a flat board of black ABS plastic.

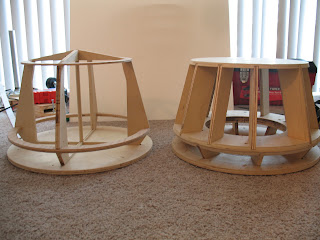
Most of my work this past month however has been on the head. Shortly after my last post, I finished cutting the ribs and did a test fit.
Photobucket

So far so good. But before I start gluing it all together, I finally bought my first sheet of Styrene, a PVC type of plastic commonly used in professional sign making and related things, to perform a test fit to make sure the plastic would retain a smooth circular shape when wrapped around only four ribs. It's a good thing I did this because the test failed. At first I thought I needed to add more ribs. But then I tried the same piece of styrene on the original head and it wrapped around perfectly. The reason is because the original head has rings going around it that help the styrene maintain a smooth bend around it. So that's what I needed to add to head v2.

I decided I needed to add a ring to the middle and the top of the head. I will use 1/4" wood and will sand the edges to the same angle as the outer edge of the ribs where the rings will be. The middle ring will need to be two 1/4" rings glued together like a sandwich with each ring's edge angled differently to match the face/neck angles (very much like the original head).

Here I'm cutting out the middle of the middle ring. Both 1/4" halves are already glued together. I'm making each ring only 1" thick from outer to inner circumference. The notches on the inside are to fit into the notches I put into the ribs.
Photobucket Photobucket

The ribs with the notches for the rings cut into them.
Photobucket

Here's the head assembled with the top ring and a close-up of how it fits together. Not a perfect fit but close enough.
Photobucket Photobucket

On Tuesday I will test fit the middle ring and drill the mounting holes into the center ankle. If all goes well I will be able to glue the head together.
One more thing I need to do is make the ankle lock for the center foot so it doesn't tilt when moving backwards.

John